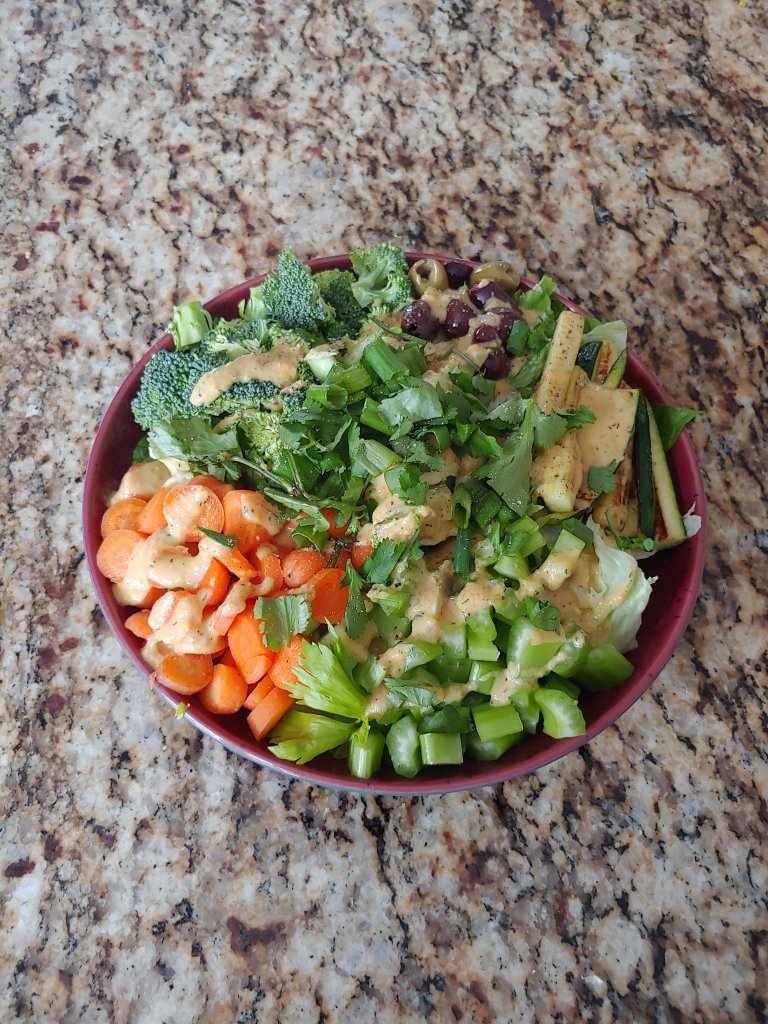
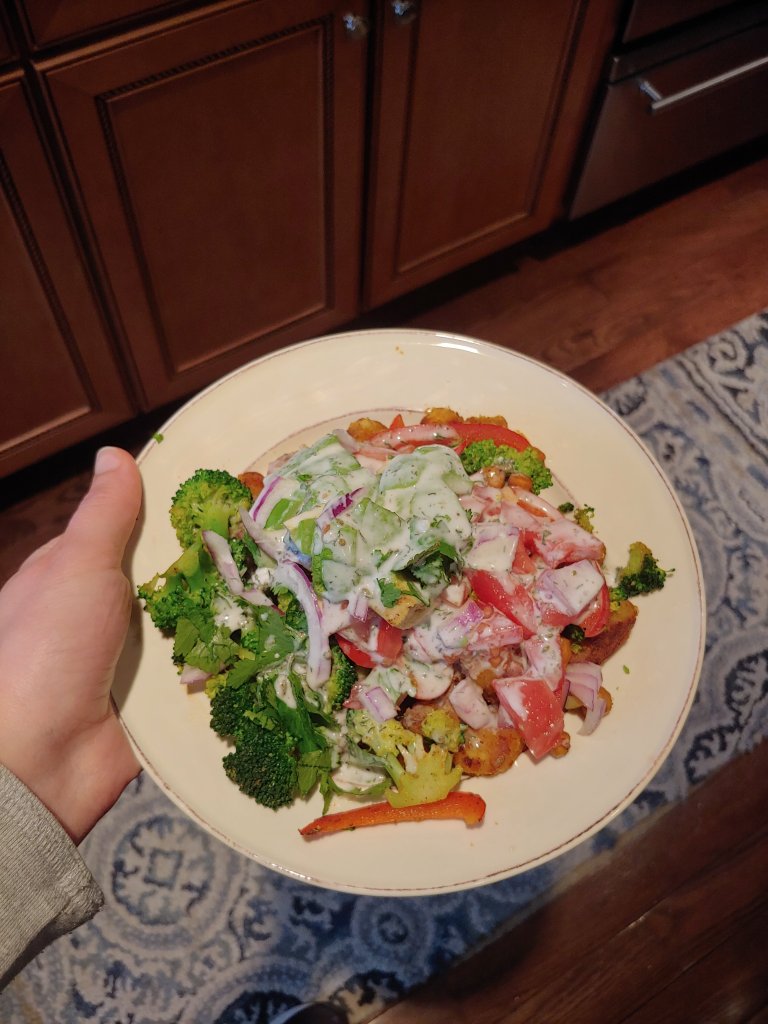
Salads are one of the most simple and straight forward lunches I can think off. Pretty low fuss, healthy, and easy to transport, making them my favorite options for a busy week! This one is no exception. It is basically all the stuff you would get on a mezze platter, placed over greens to make it a bit lighter. The hummus stars as a dressing, and is accompanied by toppings like roasted zucchini, broccoli, carrots, celery, and olives. Of course the toppings are interchangeable but these are what I associate with dipping in hummus!
I used my homemade hummus to make the dressing but you can also use any store bought variety you prefer. However, it is so easy to make that I implore you to make it homemade if you have the time/resources/access. To make this salad “prepable” I recommend preparing everything on say Sunday night so you can just throw it together in the mornings.
Ingredients:
1 lb of your favorite greens (i recommend spinach and arugula)
5 stalks of celery – halved and sliced
3 large carrots – sliced and quarters
10 oz jar of green and Kalamata olives
1 head of broccoli – chopped
2 zucchini – cut into 2 to 3 inch slices
2 – 3 avocado – sliced (I recommend slicing theses day of)
1/4 cup cilantro – chopped
1/4 cup green onion – chopped
1/2 cup hummus
1/4 cup coconut buttermilk
2 tbsp. water
salt and pepper to taste
Instructions
Mix hummus, coconut buttermilk, water, salt, and pepper in medium sized bowl until well combined – set aside, this is the hummus dressing
Rinse and chop greens if necessary – place 1 1/2 – 2 cup in a bowl
Add toppings in sections, or sprinkle over top if you prefer them mixed
Drizzle 3 tbsp. of the hummus dressing over the salad and toppings. Garnish with cilantro and green onion
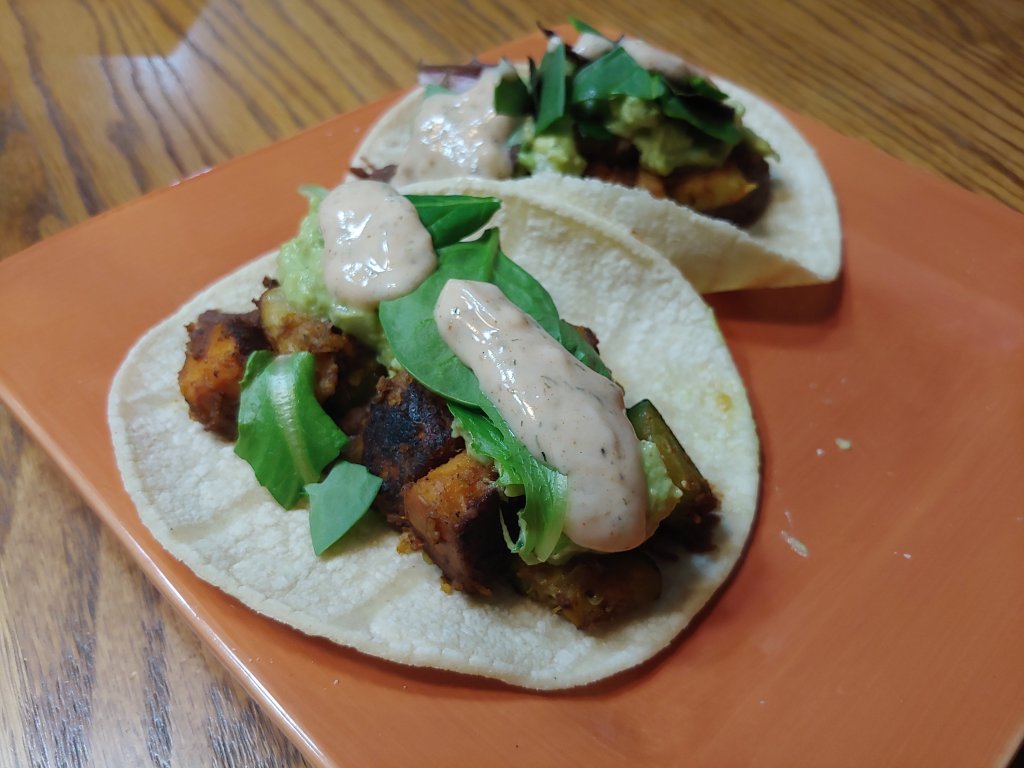
Me and regular ol’ potatoes are on the outs right now, in my latest attempt to reduce inflammation. Obviously I miss them, so I have been trying to substitute them with other non-nightshade options. Thus, these tacos were born! The parsnips and sweet potatoes serve as my potato-y substitute and honestly worked really well in a taco. I fried them up similar to the ultra crisp fried potatoes (recipe here), so they added a nice crunch to the dish.
Everything harmonized quite well in this dish as far as both flavor and texture go. The veggies had a nice crisp and were spiced with a hint of allspice, making them taste subtly of Christmas. These sat on top of refried black beans that provide some savor and substance. To top it all off was guacamole with cucumber for a little fresh snap, and a smoky yogurt ranch for that creamy harmonizing finish.
The recipe is pretty straight forward and is an excellent dish to make for a few week night meals. As it is listed here, it makes about 4 to 5 servings so is a pretty ideal prep!
Ingredients
Crispy Veggie Filling
2 medium sweet potatoes – cubed
2 medium parsnips – cubed
1 large zucchini (2 small) – cubed
6 cups water
2 tbsp. baking soda
1 tsp. salt
2 tbsp. peanut or coconut oil
1 tsp. allspice
1 tsp. chili powder
1/2 tsp. cumin
2 tsp. paprika
salt and pepper to taste
Refried Black Beans
14 oz can refried black beans (or whole beans that have been ran through a food processor)
1/2 tsp dried and ground thyme ( or 1 tbsp. fresh)
1/2 tsp. dried and ground oregano (or 1 tbsp. fresh)
2 tbsp. fresh parsley – chopped
1 clove of garlic – minced
1 tsp. smoked paprika
1/2 tsp. liquid smoke
salt and pepper to taste
This is the yogurt I used but you could also use my coconut buttermilk recipe
Other
Corn Flour tortillas
hot sauce
cilantro and green onion for garnish
Instructions:
Crispy Veggie Filling
Bring water to a rolling boil in a large pot, add baking soda and salt
Drop in cubed parsnips and sweet potatoes – boil for 10 to 15 minutes until soft but still firm – drain
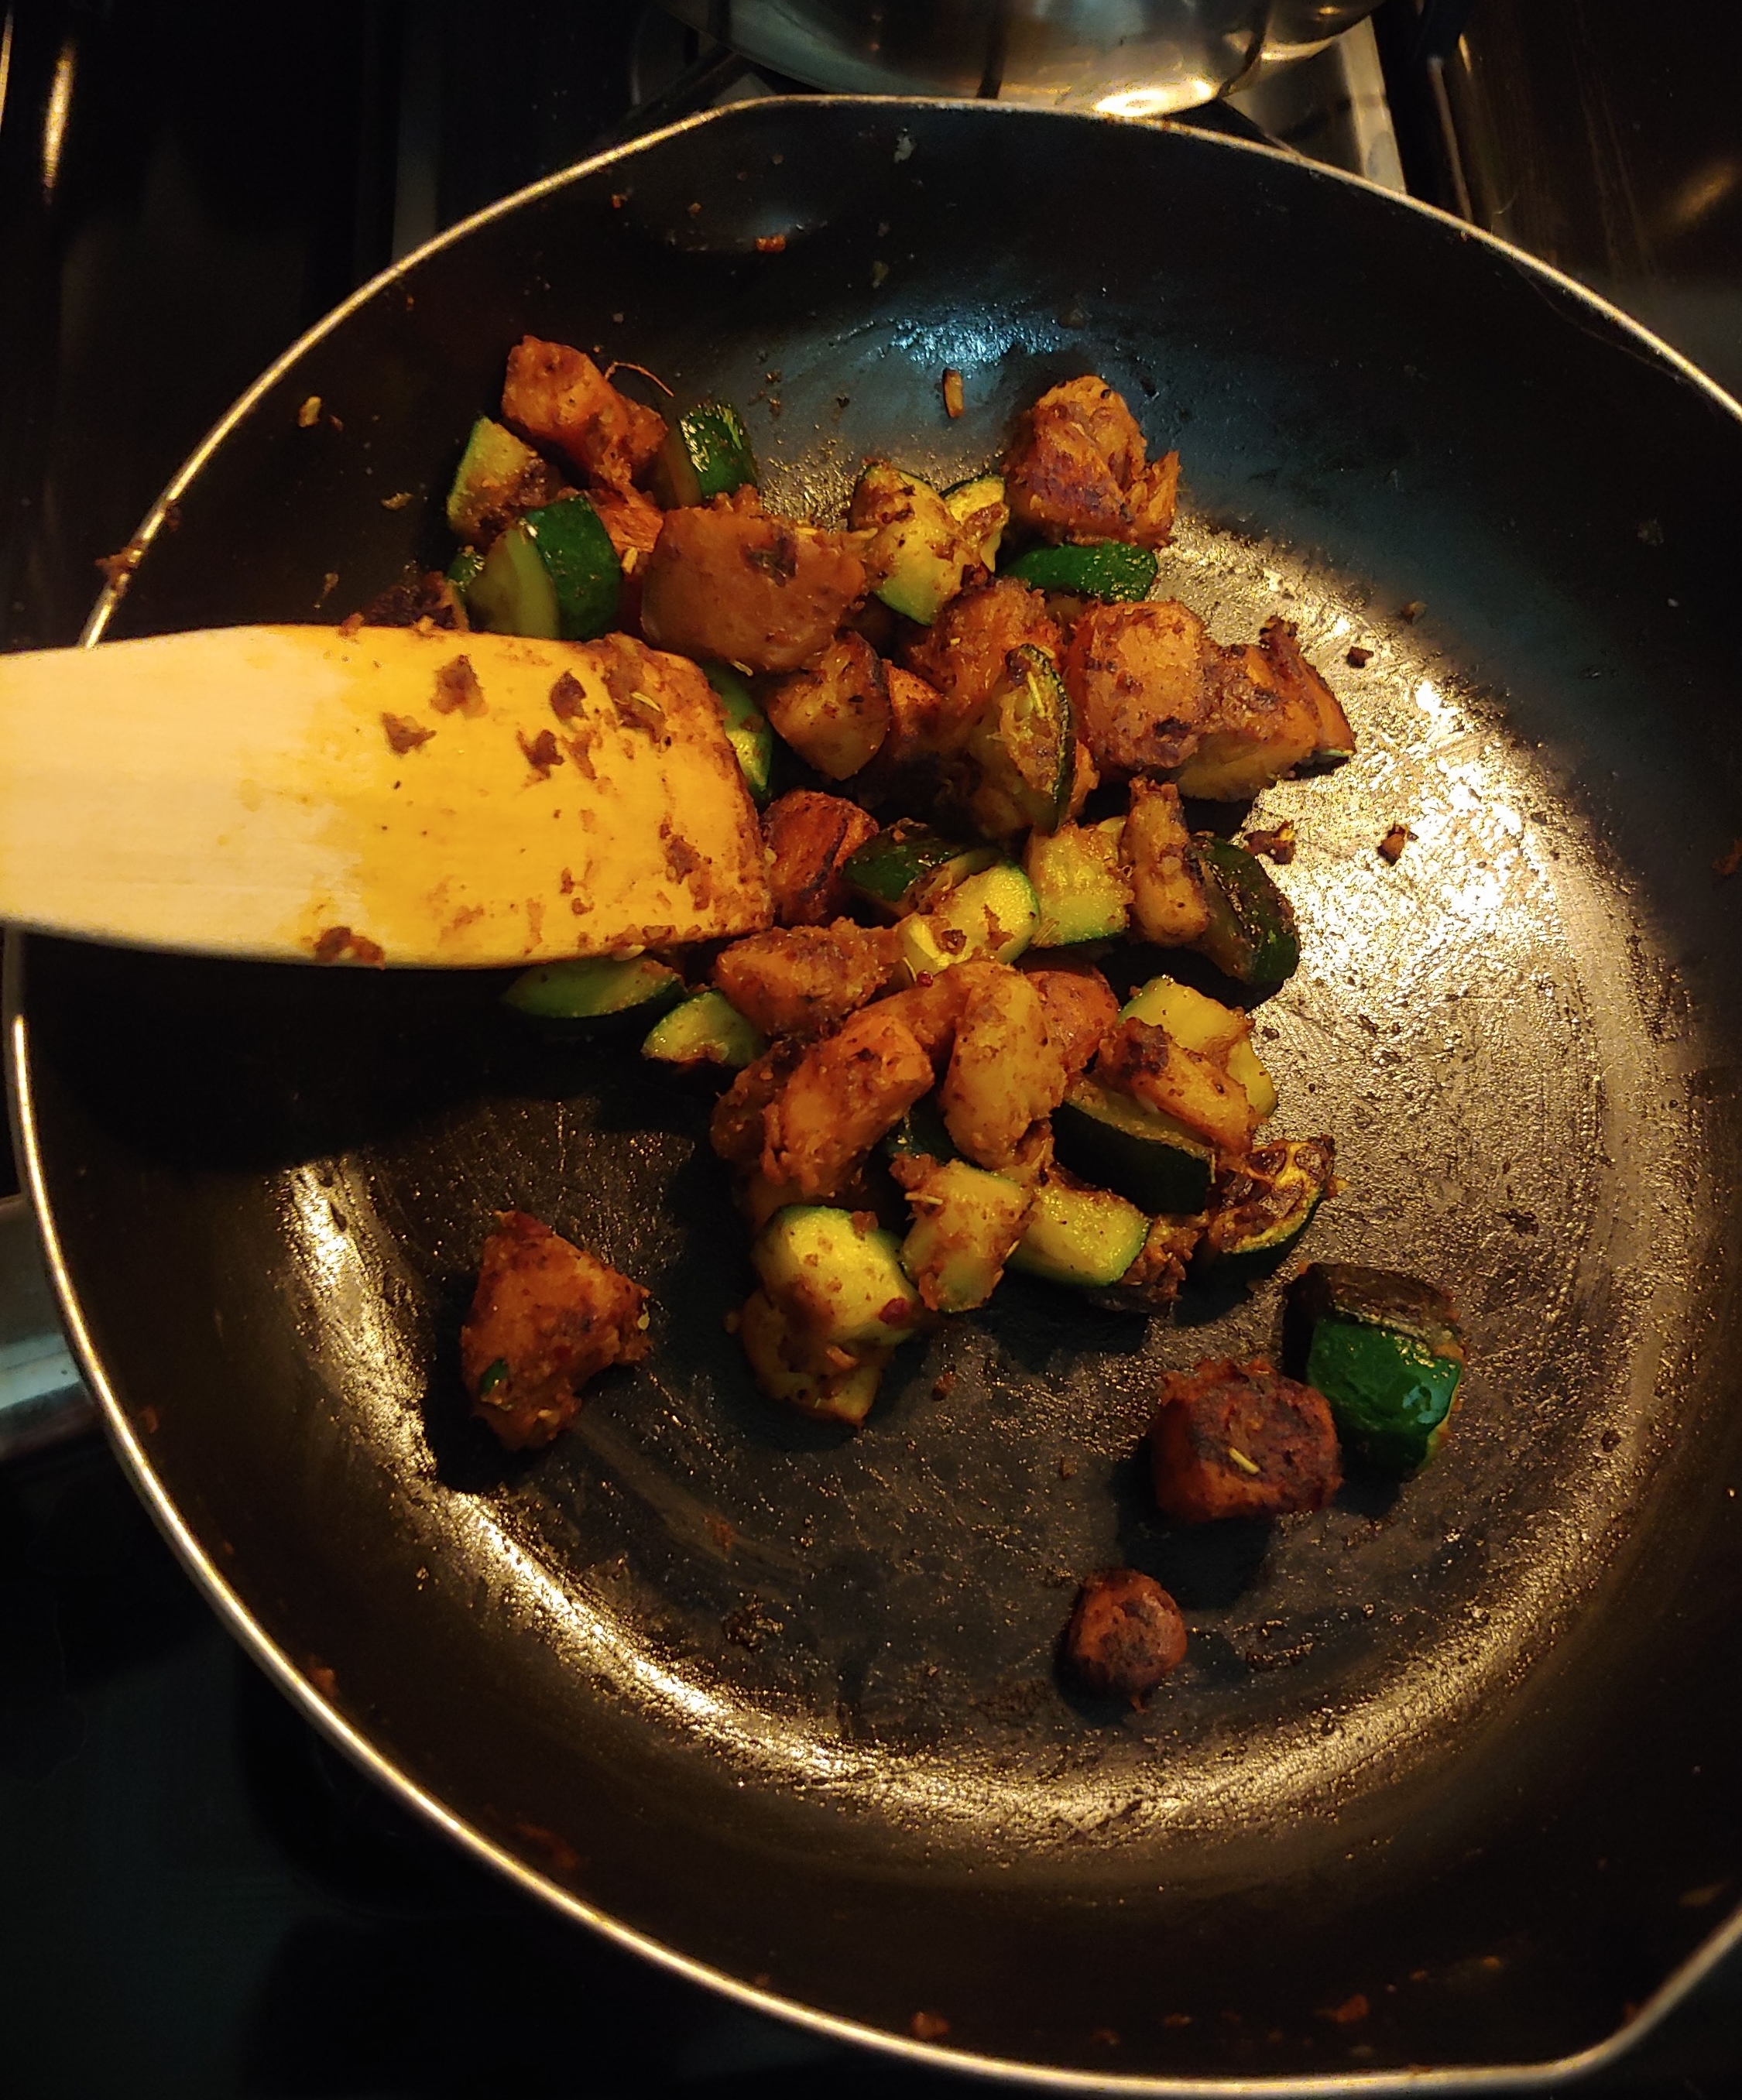
Heat the oil in a pan over medium high heat, add in boiled veggies and zucchini along with seasoning. Stir to coat in oil.
Let veggies cook on one side for 5 to 7 minutes, or until crisp. Toss and cook for an additional 5 to 7 minutes until desired crispiness is achieved (I like mine virtually burnt)
Turn heat to low until ready to eat
Refried Black Beans
Mix bean and seasoning in a microwave safe bowl
Heat in microwave for 3 minutes – set aside until ready to eat
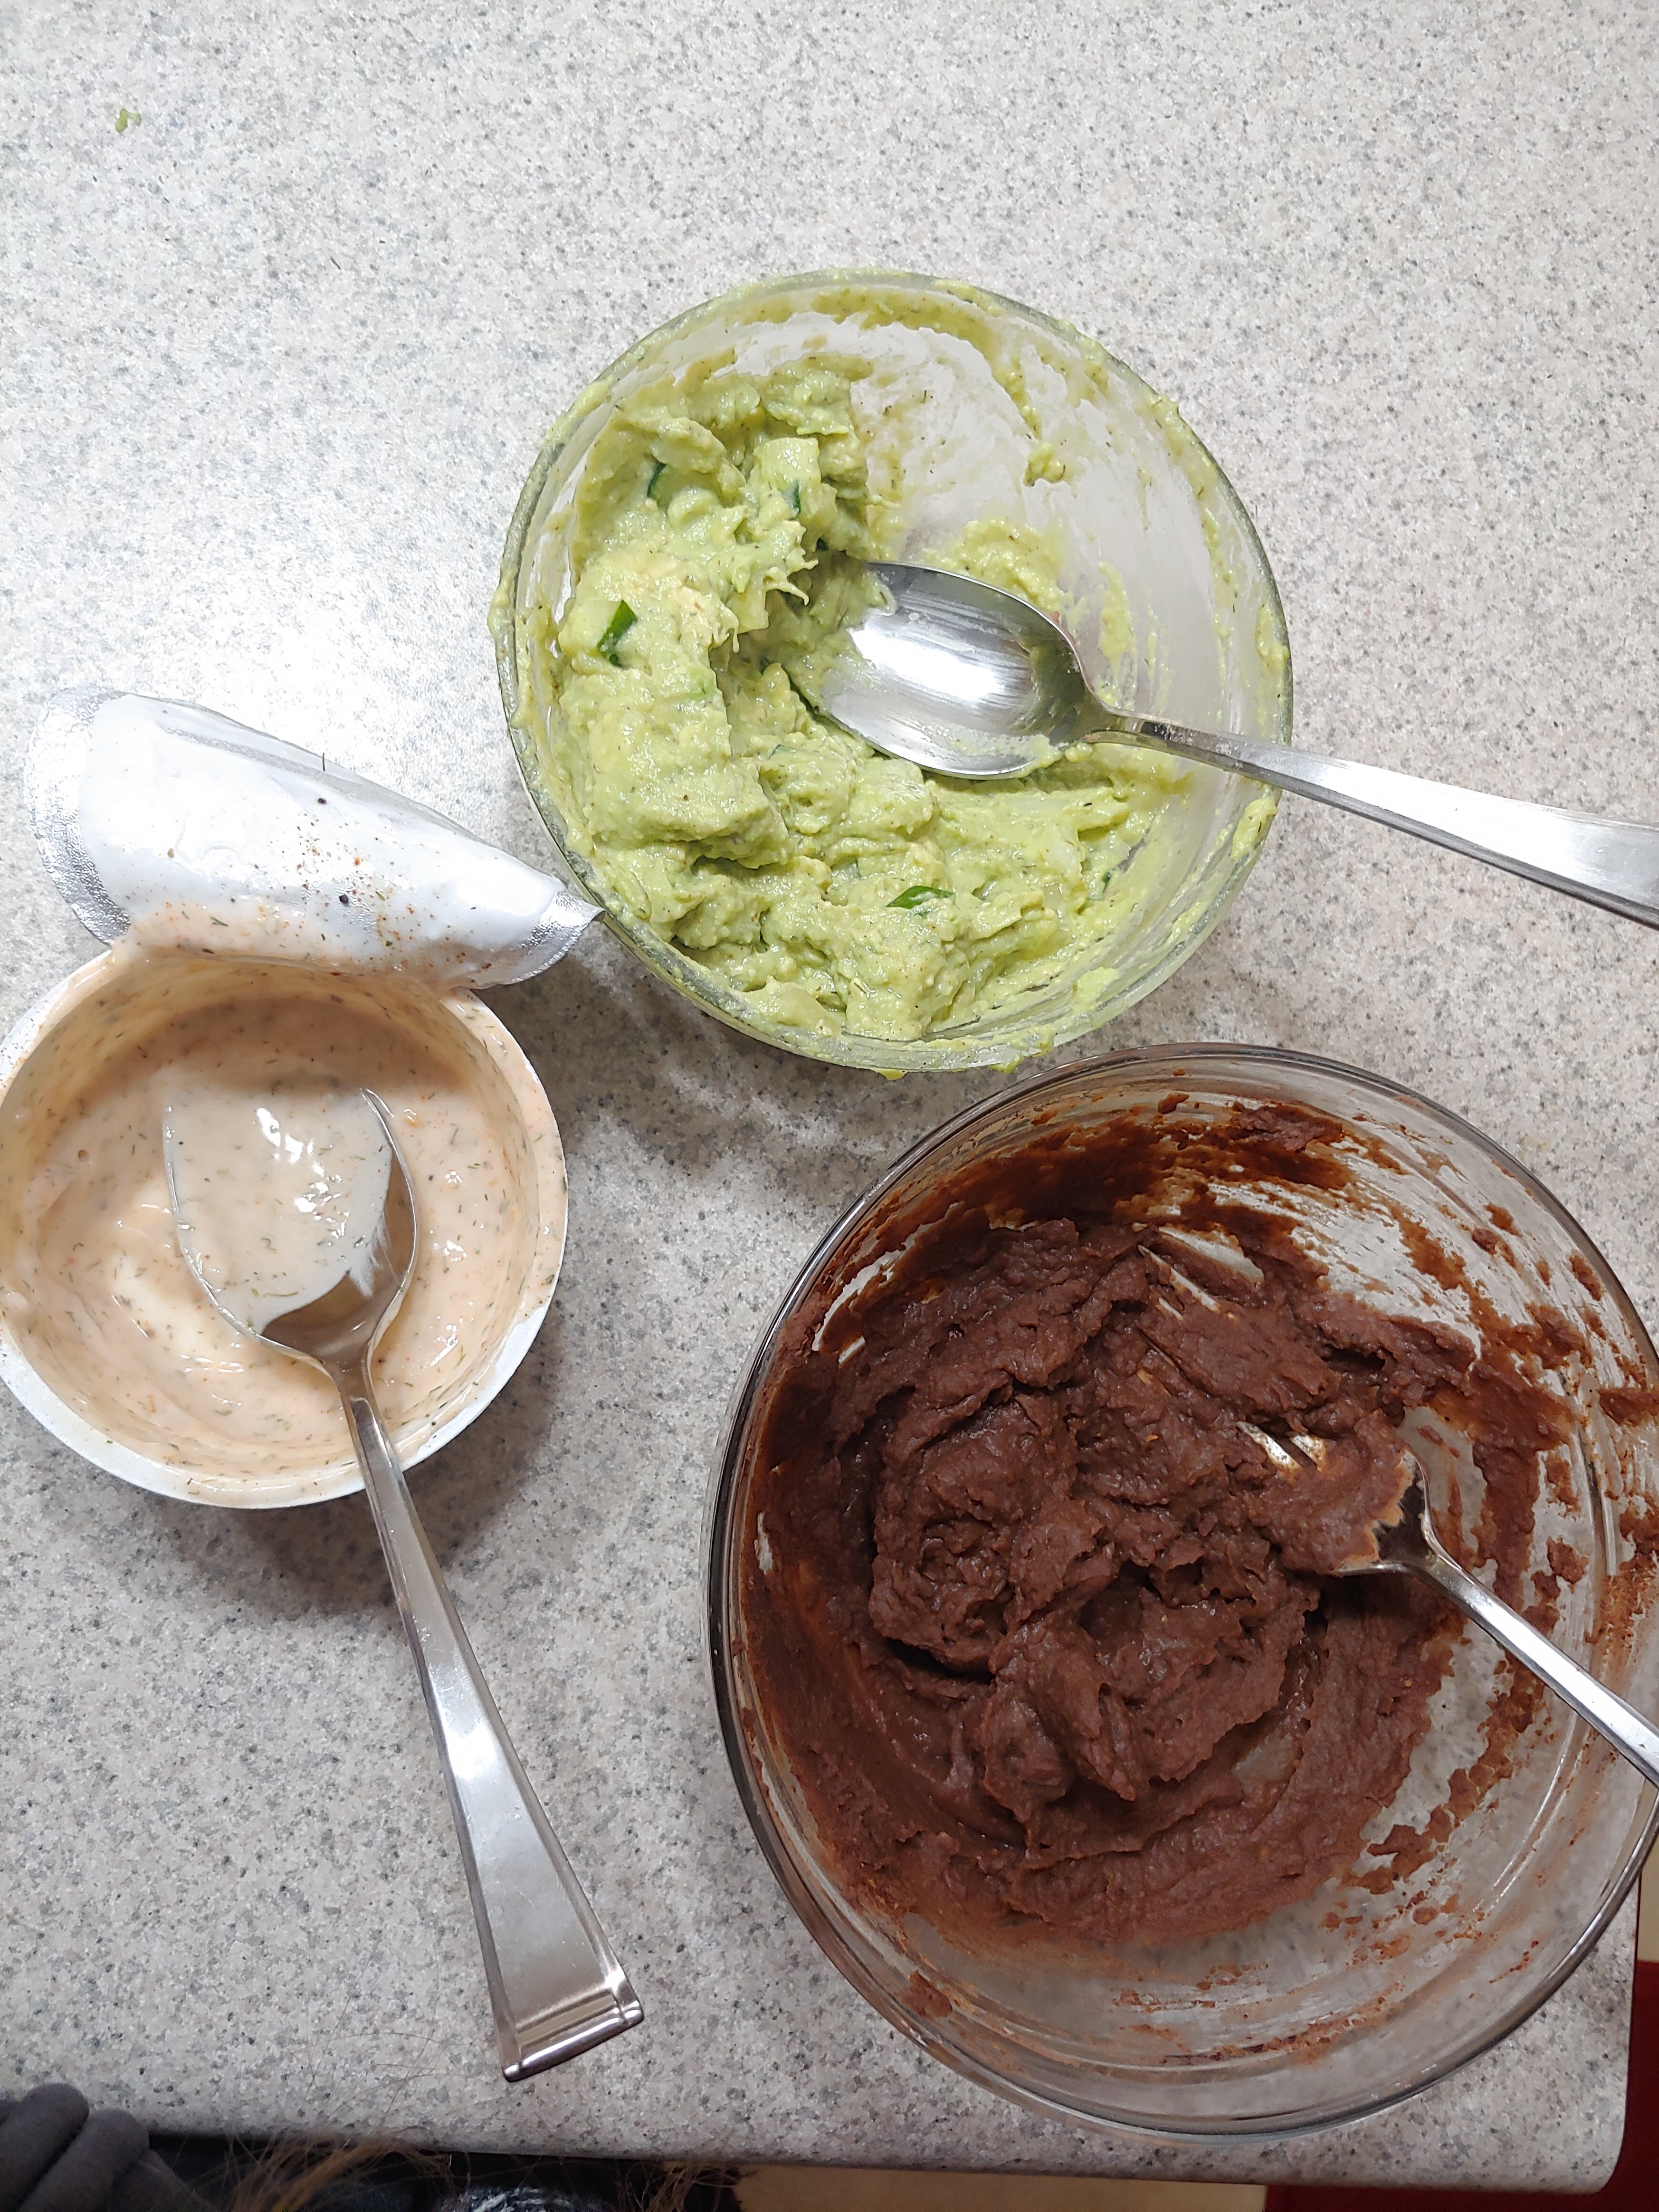
Cucumber guacamole
Combine all ingredients into a mortar and pestle – grind until well combined
Smoky yogurt based ranch
Combine all ingredients into a small bowl and stir to combine
Assembly
Heat tortillas you will use in the microwave with a cup of water for 30 seconds
spread 1 – 2 tablespoons of beans into each tortilla, top with crispy veggies
top with guacamole and ranch sauce and garnish with your desired fixins
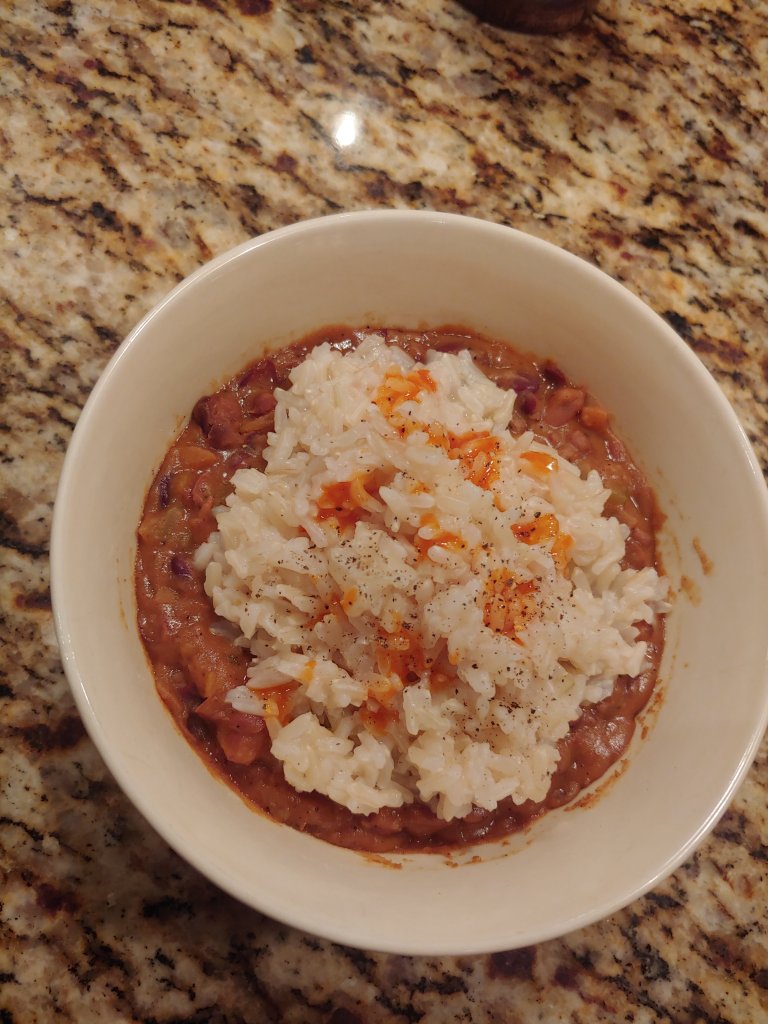
Red beans and rice is a dish that is of Creole origin (not Cajun, according to Wikipedia!). It is commonly served along rice in the southern state of Louisiana, and most will have likely come across it on a trip to New Orleans. New Orleans is one of my favorite cities, it’s brimming with art, and music, and delicious food. We visited a lot when we were growing up, and made a fair amount of Cajun and Creole dishes at home.
My stomach is certainly no stranger to red beans and rice, and I rarely get sick of the stuff. So simply yet so flavor pack! It is also a dish that can easily be made gluten free and vegetarian. This recipe comes together like rapid fire, but I recommend letting it stew in the pot for a few extra hours to bring out all of the flavors.
I am going to harp on this again for this recipe: RINSE YOUR RICE. It is so much better. Most rice packages actually recommend it! Also, please, mash some of the beans. It releases some of their starches and helps to thicken the liquid into more of a stew and less of a soup.
Ingredients:
2 cans of red beans
2 cans of dark red beans
2 tbsp. olive oil
1 small yellow onion – chopped
3 celery stalks – chopped
1 large carrot – chopped
1 red pepper – chopped (optional)
3 cloves of garlic chopped
Veggie sausage – sliced (optional – I never use it)
32 oz carton of GF veggie stock
2 bay leaves
1/4 cup of “bam” (Emeril’s signature seasoning blend – recipe here)
Hot sauce, salt, pepper and extra “bam” to taste
2 cups of Jasmine Rice – rinsed
5 Cups water
Instructions:
Heat oil in a large pot over medium heat – add in onions and a hearty pinch of salt. Sautee until fragrant – about 3 minutes
Add celery, carrots, pepper (if using), garlic, bay leaves, 2 tbsp. bam and veggie sausage to the pot. Sautee for an additional 5 minutes
Drain beans and add to pot along with veggie stock. Increase heat and bring to a rolling boil – reduce to a simmer and cover. Allow to cook for 10 to 15 minutes to get the beans nice and soft
Use a masher to smash some of the beans into a paste – leave some beans whole. Stir to combine.
Cover and let simmer for an additional 10 – 15 minutes, stirring occasionally so that it doesn’t stick. It will thicken up in this time.
Meanwhile start the rice by combining the rice and water into a medium sauce pan (make sure to salt the water well). Bring the rice to a boil for 5 minutes, then reduce to a low simmer and cook covered for 20 minutes or until all the water is absorbed.
At this point, it’s ready to eat. However, I recommend leaving it set to low for a few hours just to really bring all the flavors together.
Serve with rice over the top or bottom (however you prefer) and a few healthy dashes of hot sauce.
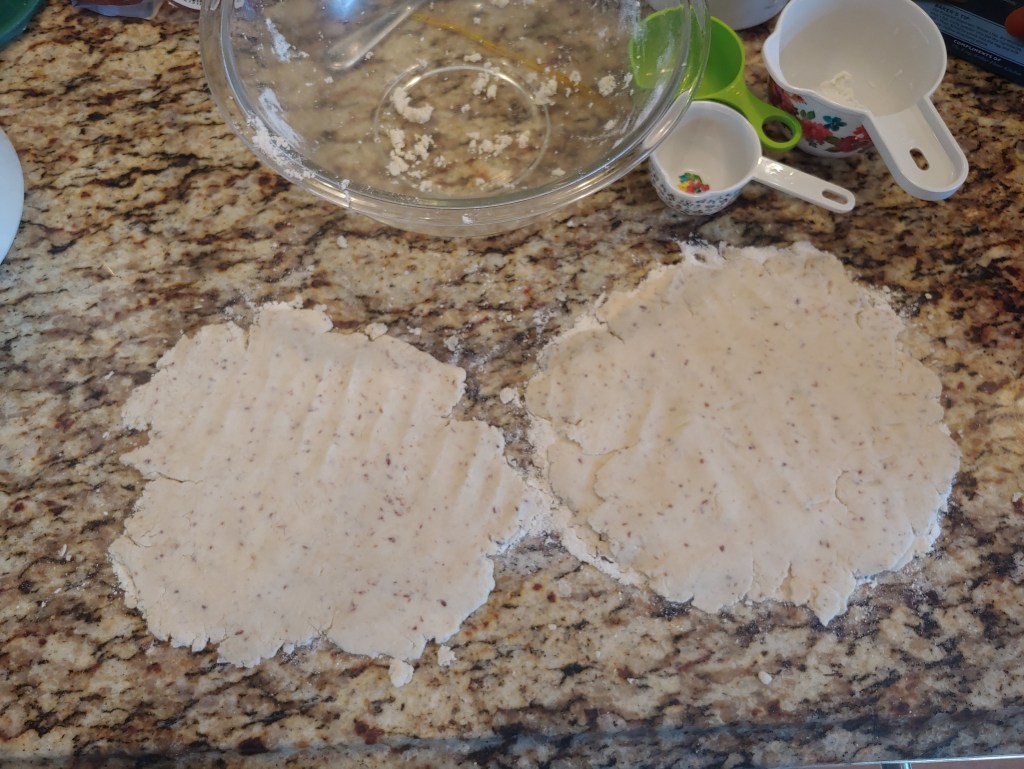
I love making homemade biscuits, it makes me feel accomplished and the end result is far better than store bought stuff. It is also very difficult to find canned gluten free biscuits. I’ve spent a good deal of time with this recipe, trying to perfect it and get the right combination of flakiness and density, like you have with a regular old biscuit. These guys are pretty well there, and are an excellent Saturday morning comfort food.
A rough butter crumble
That being said the recipe come with a few specifics that are important to highlight:
I used coconut milk or my coconut butter milk (recipe here) in this recipe. The fattiness helps keep the biscuits moist and dense. I do the same thing if I am making scones (English or American). I find there really isn’t another milk that you can substitute.
The biscuits rely on baking powder/soda + ACV for a bit of leavening, and flax and corn starch for binding
You have to layer and fold the biscuits in order to get that desired flakiness, as if you are making croissants. While cutting in the butter does help, stacking achieves those nice flaky layers we all love
This is true with both regular and GF/Vegan biscuits: do not turn the cutter or cup when cutting out the biscuits. This will crimp the edges and they will not rise as nicely
The layering process,; these get folded in half
Okay. Now that we got that cleared up! This recipe makes 5 to 6 biscuits. Not a huge amount, but enough for biscuits and gravy for 2! You can of course increase the recipe if you like more biscuits, or better yet, would like a full biscuit feast!
Ingredients
1 1/2 cups flour
1 tbsp. corn starch
1 tsp baking powder
1/2 tsp baking soda
1/2 tsp salt
1 tbsp. ground flax seeds
3 tbsp. + 1/4 cups of coconut buttermilk (or milk)
1 tbsp. water
4 tbsp. vegan butter
2 tsp. apple cider vinegar
2 tsp. agave or other liquid sweetener
Instructions
Mix flax wit 3 tbsp. coconut butter milk and 1 tbsp. water – set aside to gel
Preheat oven to 375 F
Combine all dry ingredients into a large mixing bowl and whisk together
Cut butter into the dry ingredients using a fork or pastry blender (you can also use a food processor) until it resembles a rough crumble
Create a well in the middle of the dry mixture, and add in the remaining wet ingredients. Fold until the mixture comes together, you may need to use your hands.
Turn the dough onto a floured surface and knead 2-3 times, then cut into 3 equal sections
Roll or press each of the sections out to be about 1/4 of an inch thick. Layer them on top of each other and press down slightly to get them to stick together
Fold the dough in half and press down again, the dough should be around an inch thick
Use a round cookie cutter or drinking glass to cut out biscuits. Collect the dough and repeat the rolling and folding process again until the scraps are too small to use
Place the biscuits on an oiled baking tray. Bake for 15 to 20 minutes, or until golden brown.
Serve with gravy, or jam, or as a breakfast sandwich!
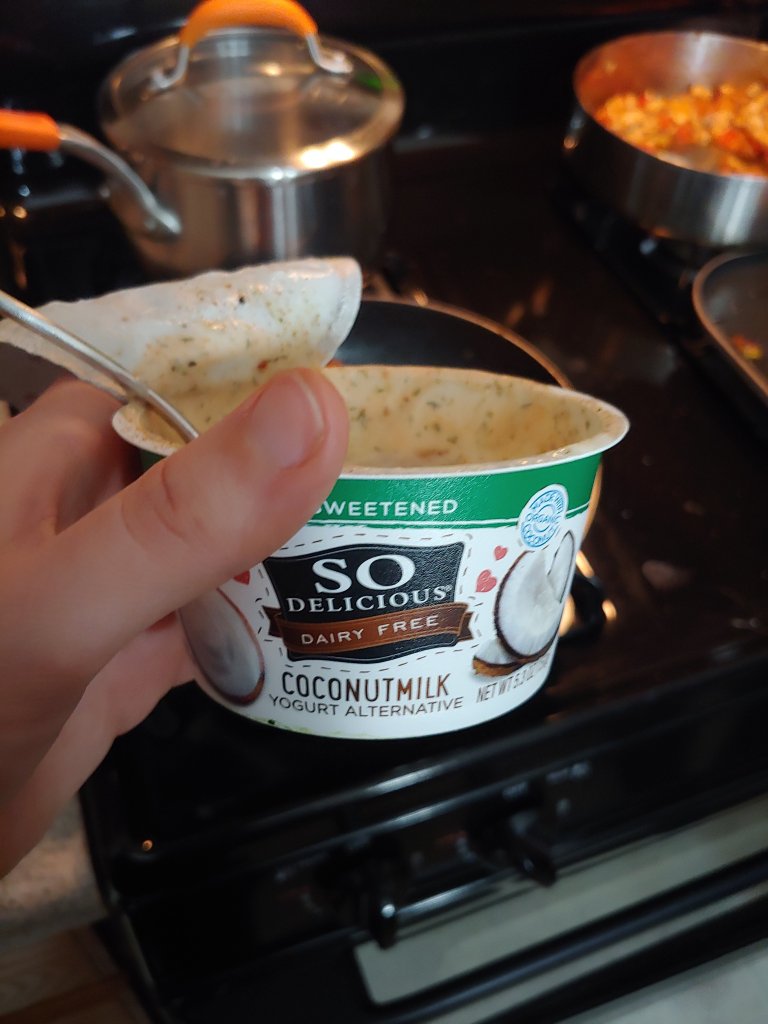
I’ve started making my own vegan yogurt, cause why not? But really because there is all kinds of stuff in store bought yogurt that I simply don’t want to put in my body as regularly as I eat the stuff. Not that it is soooo awful, it’s just the less preservatives and processed stuff I eat, the better I feel. So I opt to make my own, cause the instant pot makes it nice and simple!
This recipe is in fact a two-for, you can make both coconut buttermilk or coconut yogurt. The difference is one ingredient, Agar-Agar! The yogurt requires a thickening agent in order to give it the yogurt-y texture and agar-agar achieves that. Other wise you end up with a thicker fermented coconut milk. Both are useful, just for different things!
I like the “buttermilk” for baking, sauces, and smoothies. Alternatively, the yogurt is better for dips, mixing in for “creaminess, and eating straight. So here you can get the best of both, depending on what you’re going for!
Some tips before you have at it:
In order to avoid other types of cultures clean the instant pot VERY well before making yogurt. You may want to run a “cleaning cycle” with some water and vinegar before starting. To do this mix 1/2 cup of vinegar with 1/2 cup of water in the instant pot. Pressure cook on high for 15 minutes
Do not over culture. I made this mistake the first time. It was a disaster and I was very sad. I find that 8 hours does the trick, but if you’re willing to chance it you could do up to 12 hours.
I recommend starting this in the morning so that it will have time to set in the fridge for 12 hours and be ready for breakfast the following day.
You can also get agar-agar in flake and brick form. If using the bring, break it up in a food processor before until it becomes flaky and treat as flakes.
Ingredients
2 14oz cans coconut milk
1 1/2 tsp Agar-Agar Powder (2 tbsp. Agar-Agar flakes)- if making yogurt
1 cup of old coconut yogurt OR
1 14 oz can coconut cream plus enough probiotic capsules to achieve 50 billion live active cultures
Flavorings such as sweeteners, vanilla, fruit, chocolate, or other extracts
Instructions:
Heat agar-agar and coconut milk in a microwave safe bowl until it simmers, place this in the instant pot
Place yogurt (or cream + capsules) plus any flavorings in the instant pot
Close the instant pot and press the yogurt button. Set to normal for 8 hours.
Once the fermentation is finished, divide the yogurt between very clean jars and leave to set in the fridge over night (at least 12 hours)
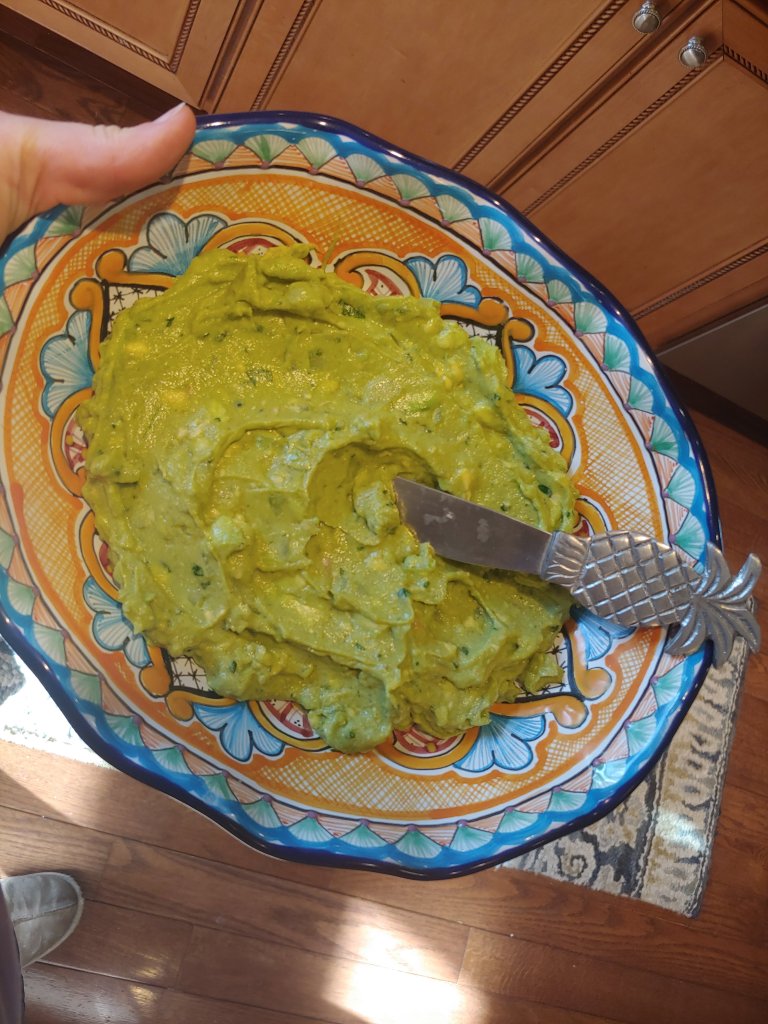
I try to cut out onions and tomatoes where possible, as they cause inflammation and make me feel less than tip top. Those are, however, two of the key ingredients in guacamole. So I set myself to some thinking: What could provide that extra crunch you get from onions? And furthermore, will I even miss the tomatoes?
The answers? Celery and no! The flavor of this is unique and creamy and doesn’t need the hearty tomato to round it out. The celery also provides the perfect crunch and a bit of added freshness that delivers the ideal balance.
We like to make our in a mortar and pestle, but you can simply use a fork. Whatever method you choose just don’t forget the acid and store it with the left over avocado pits in the dip, both will keep it fresher longer!
A tip on checking for ripeness on avocados: Check the nub at the top. This is where the avocado was attached to the tree. When fruit ripens, the cells between the nub and the avocado die allowing the to be separated. If you pull/push on the nub it should easily pop off and be green on the inside. If it doesn’t come off, it is under ripe. If it comes off but the nubs previous home is brown, the avocado is over ripe. So now ya know!
Ingredients
3 ripe avocados
1 stalk of celery, chopped
1/2 tsp ground coriander seeds
1/2 tsp ground cumin seeds
1 tbsp. fresh dill (1 tsp. dry)
1 tbsp. fresh cilantro
1 tbsp. lemon juice
2 tsp. lime juice
salt and pepper to taste
Instructions
Place all ingredients into the bowl of a mortar and pestle
Smash ’em all up until the guac’ is slightly paste like but also has some chunks of avocado
Transfer to a fancy serving bowl or a Tupperware with pits in the dip
Eat with chips, on tacos, or with a spoon. Whatever you like to do!
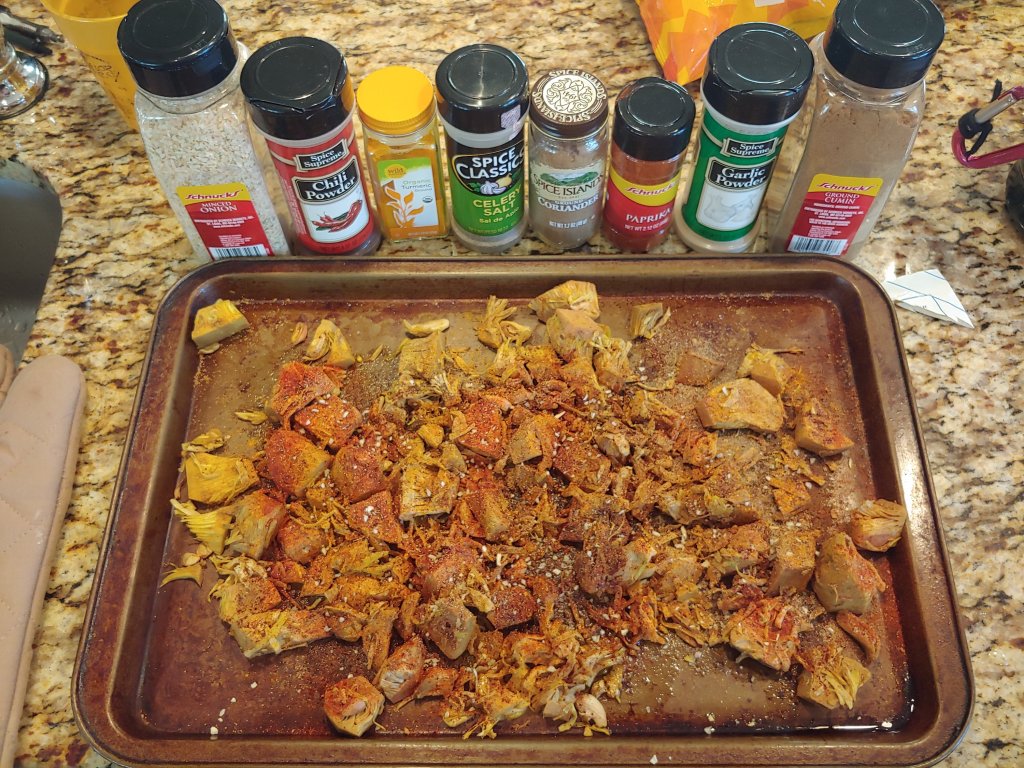
In truth, this is completely inspired by the delicious carnitas jackfruit from Lulu’s Local Eatery in STL. It is amazing and I needed to learn to replicate it. It was actually pretty simple, and can be done in the oven!
I buy my jackfruit frozen or in brine (NOT SYRUP) from the Indian Spice Bizarre up the road. If you don’t have access to such a wonderful amenity, you can find it at stores like Fresh Thyme or Trader Joe’s in the canned fruit section labeled as “Young Green Jackfruit in Brine”. One thing to remember with this recipe is that the jackfruit should be well dried out before you add the seasoning and oil. To achieve said “dryness” we bake the jackfruit for 10 minutes before jazzing it up.
I really love this recipe and serves as a good addition to tacos, nachos, or even chili! We originally made it for Super Bowl Sunday for some Jackfruit Sliders, just to show case the diversity in this yummy stuff!
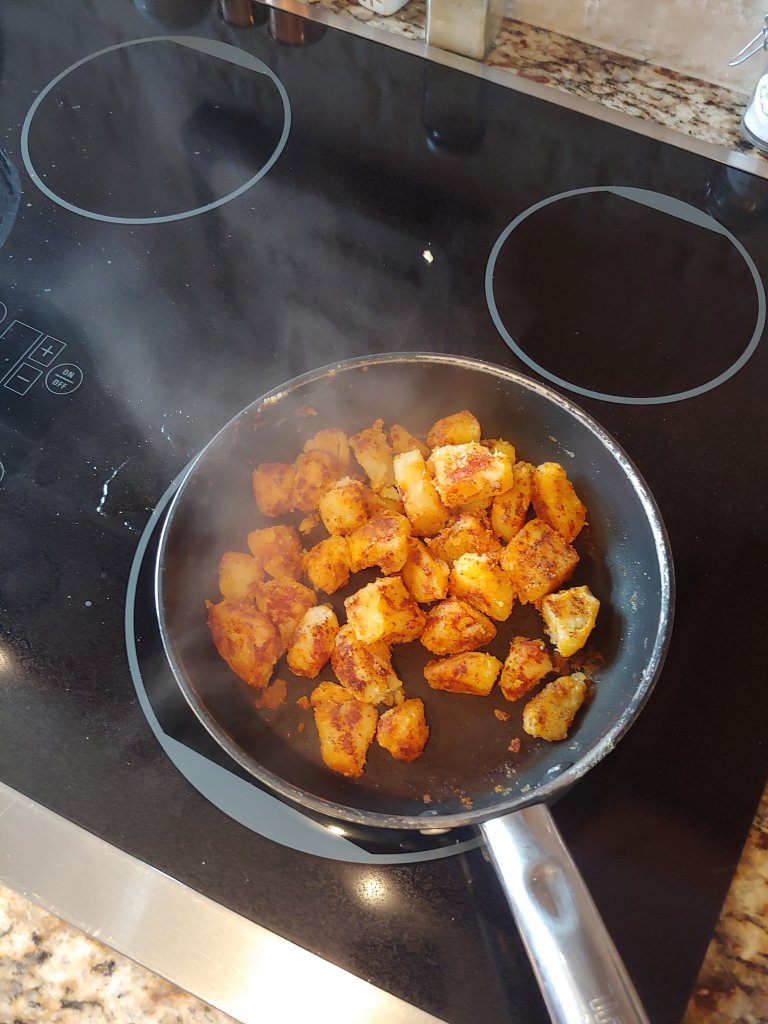
Ok, ok! I know these aren’t the ~healthiest~ but I love a good fried potato and they are good for your souls health! I really like these for breakfast or in tacos but they could really be dressed up anyway. They are so simple and WAY quicker then frying them directly in the pan.
These tats are cooked twice; first they’re boiled in baking soda + water, and then they are pan fried. The baking soda reduces the cooking time by softening the potatoes faster and also helps them to crisp up quicker! Flavor them anyway you please, but I think smoked paprika and chili powder really sell ’em (they’re also my favorite spices though).
In the picture below I topped the potatoes with grilled veggies, guacamole, and a herb cream I made from some homemade yogurt. But really they don’t need any toppings to be delicious, so do as you please!
Ingredients
1 russet potato – cubed (1 potato = 1 serving, for me at lease)
I am in love with the Instant Pot, sue me! The thing is magic, and it makes porridge 1000 times easier in the mornings. Since I can’t eat oats my porridge options are limited, which is frankly awful because I love a warm and creamy bowl of sweet grainy goodness in the morning. Enter millet: my favorite oat alternative.
Millet, however, takes a bit longer to cook that rolled oat, so I often opt to pre bake it to make my mornings quicker. The pre bake process is streamlined with the instant pot, and I use the “pot-in-pot” method to ensure the porridge doesn’t dry out or clog the steam vent. This recipe gives me about 4 servings which I add milk to before reheating and topping with goodies like DF yogurt and fresh fruit.
I highly recommend this millet porridge for busy week day morning and hope you find it as enjoyable as I do.
Ingredients
1 Cup Millet
2 1/2 Cups coconut milk
1/4 tsp salt
1 tbsp. coconut oil
nuts, fruits, and other toppings ( I love coconut flakes)
1/2 cup water
Instructions
combine the millet, coconut milk, salt, and coconut oil in a small oven safe pan that will fit inside your instant pot (I recommend using metal, as glass and ceramic pose more of a risk)
Pour 1/2 cup of water into the instant pot and place rack in side. Cover the pan with foil and place on top of the rack.
Close the instant pot and set to pressure cook on high for 15 minutes
Once finished, release the pressure through the valve and remove the pan.
You should get around 4 servings that you can jazz up anyway you please! To reheat at 1 to 2 tablespoons of DF milk and reheat before eating.
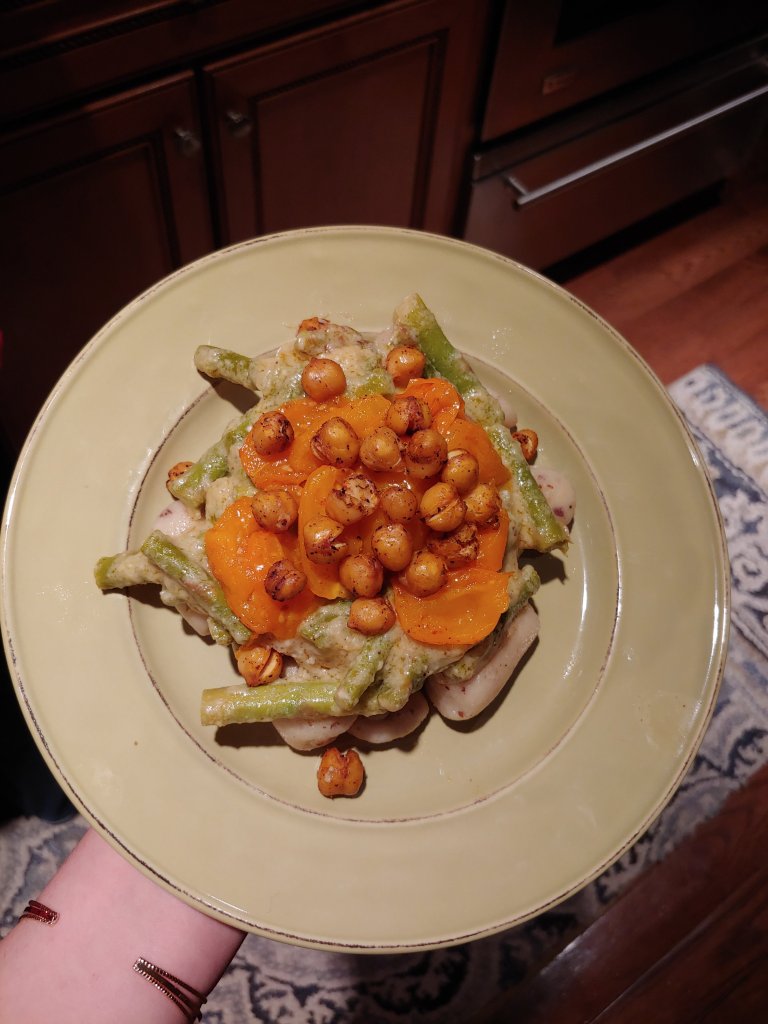
I finally nailed my gnocchi recipe! I am incredibly proud. Especially since I had been craving it for months. Here I paired it with asparagus in a almondy lemony white wine sauce that closely approximates a white wine cream. That was all topped with some crispy chickpeas and roasted cherry tomatoes.
It all paired together really well: a nutty zesty sauce with an earthy chickpea crunch, plus sweet hearty tomatoes all on top of perfect potato pillows.
I am not going to lie though, this is time consuming, particularly the gnocchi itself. It was also nice to have a second set of hands too when it came to boiling and crisping the gnocchi so it didn’t burn. So maybe save this for special occasions or when you wanna spend time cooking with someone.
A few things about making the gnocchi:
The potatoes need to be mashed well with no lumps or clumps
The chickpea flour and flax seed serve as an excellent binder, I don’t think other options would work as well
When making the dough, it is important that it is dry enough and starts to pull away from the side of the bowl
Do not skip the kneading, the dough needs to be tackier to roll it out
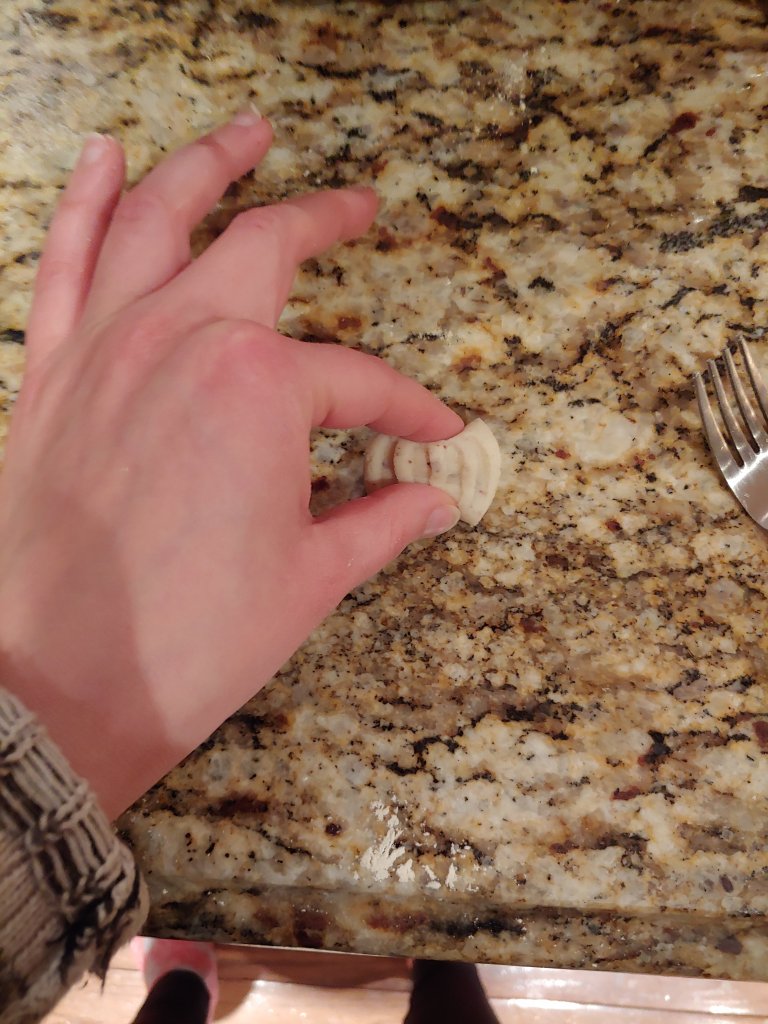
Last have fun with the shapes! It much more rewarding when your noodles are cuties
Dough pulling away from potOur fun shapes, the right are maybe… Bowties?
The gnocchi is boiled after the shapes are made in order to give them a chewy texture. They should boil until they start to bob to the top. We then tossed them in a buttered pan to give them a little crisp and so they wouldn’t stick together as much. I recommend doing this in batches in order to keep a handle on thing.
Boiling the gnocchiCrisping the gnocchi
Ingredients
Gnocchi
2 large russet potatoes
1 1/2 cups GF all purpose flour plus extra for dusting
2 tbsp ground flax seeds
8 tbsp. liquid drained from chickpeas (“aquafaba”)
2 tbsp. chickpea flour
1 tsp. salt
White wine sauce
1 yellow onion – thinly sliced and quartered
2 tbsp. olive oil
3 tsp. multipurpose seasoning (recipe here)
1 tsp. pepper
1 tsp. paprika
4 tbsp. vegan butter or more olive oil
1/2 cup almond flour
1 tbsp. nutritional yeast
2 cups dry white wine (we used a vidal blanc)
1/2 cup dairy free milk
1 1/2 tsp. cornstarch
1/2 tsp. Lemon zest
1/2 cup. lemon juice (juice of 1 lemon)
1 bunch of asparagus, cut into 1 inch pieces
Crispy chickpeas
1 can chickpeas
1 tsp. multipurpose seasoning
1 tbsp. oil
1 tsp. paprika
pepper to taste
Roasted cherry tomatoes
1 pint cherry tomatoes, halved long ways
1 tsp oil
salt, pepper, and paprika to taste
Instructions
Gnocchi
Peel and boil potatoes until they are well done and can easily be punctured with a fork. Drain in a colander and let cool (I left mine in the sink and started the other parts)
Meanwhile combine 2 tbsp. flax with 5 tbsp. of aquafaba, additionally combine 2 tbsp chickpea flour and 3 tbsp. aquafaba. Set both aside to thicken while potatoes cool.
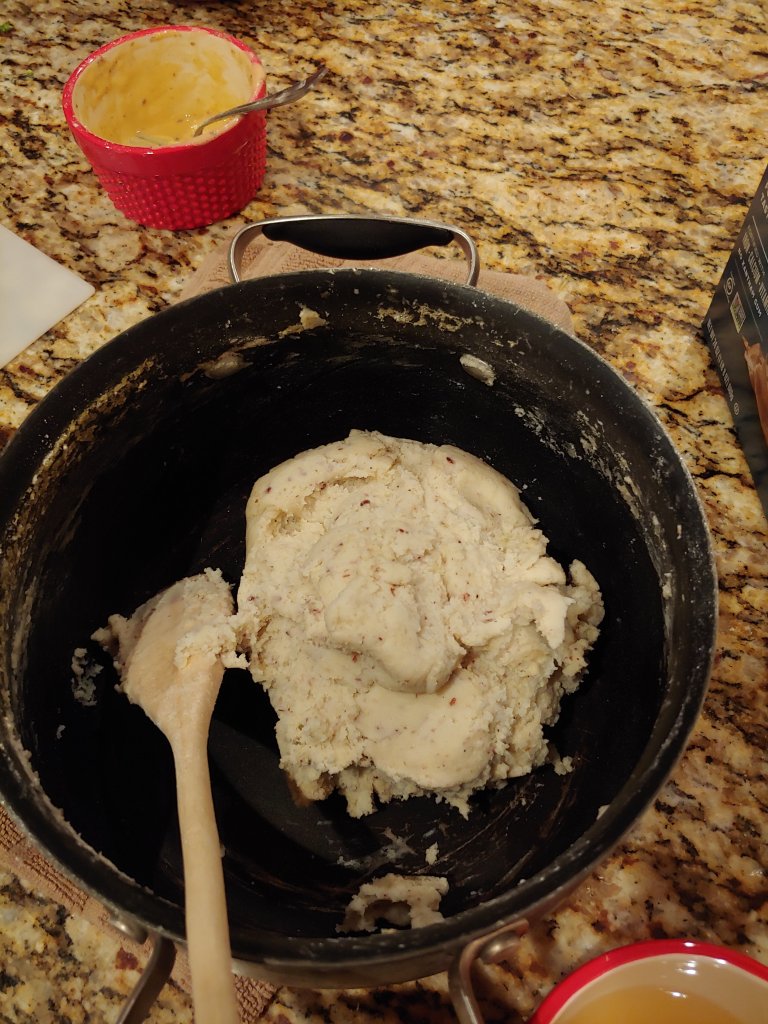
Transfer cooled and drained potatoes into a mixing bowl and mash, ensuring no large clumps remain.
Add in chickpea and flax mixtures and salt. Add gf flour in 1/2 cup increments, mixing thoroughly after each addition. It may become tough to mix but keep at it! The dough will pull away from the sides of the bowl slightly but still be a bit shaggy.
Turn dough onto a well floured surface (I use a combo of chickpea and all purpose flour, about 1:3). Knead for 5 minutes, adding more flour as needed. You will probably use another 1/2 cup of flour. The goal is to make the dough more tacky so it can be rolled and sliced.
Shape the dough into a ball and cut into 6 roughly even pieces. Roll each piece into an 1/2 inch thick rope, as if you were making pretzels.
Cut the ropes into 1 inch pieces and shape as you’d like (pictures of how I achieved mine are below). Place on a baking tray
Heat 1 tsp vegan butter or olive oil in a pan over medium heat.
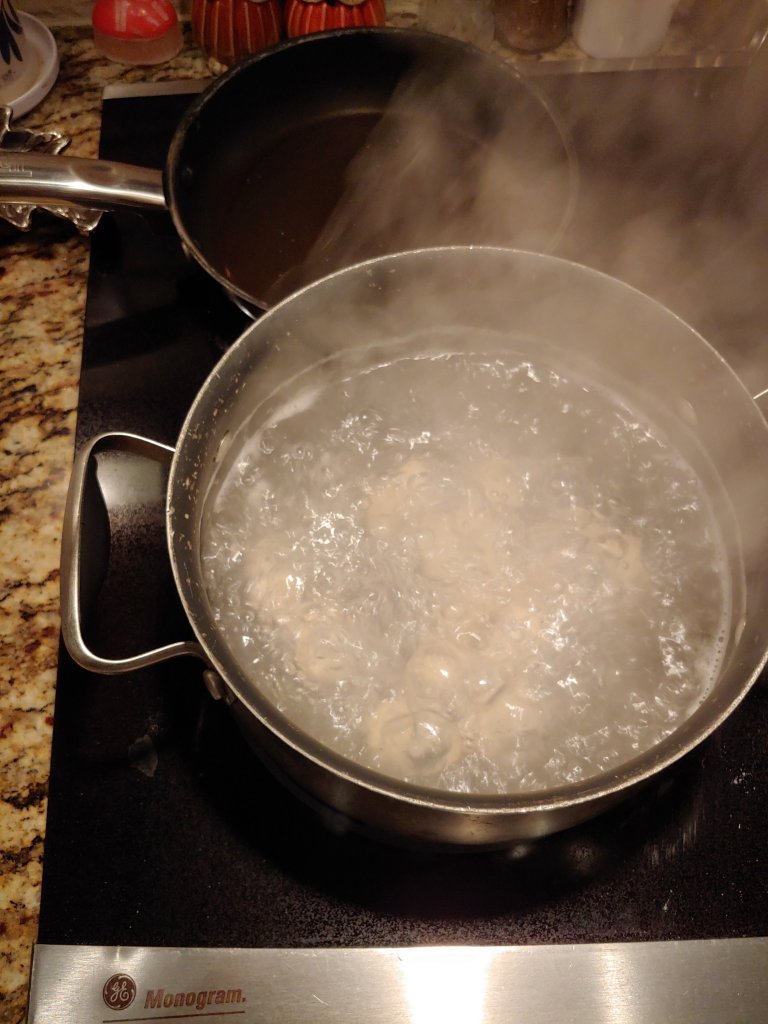
Bring a pot of water to a rolling boil, and drop the gnocchi in about 15 at a time.
Remove gnocchi with a slotted spoon when they float to the top. Immediately transfer to the heated pan. Move the pieces around until they have a nice even crisp.
Remove from pan and store on a plate in the microwave or oven. Repeat 8 – 11 until all gnocchi is cooked.
Simply rolled like a pretzelOr pressed with a fork and pinched
White wine sauce
Heat olive oil over medium heat and add in onions and multipurpose seasoning. Saute for 2 minutes.
Reduce heat to low and allow onions to caramelize, stirring occasionally. I do this while boiling potatoes for the gnocchi
Increase heat to medium and add butter, paprika, lemon zest, and pepper. Saute for 2 minutes.
Whisk together almond flour, nutritional yeast, and corn starch. Add into butter mixture and stir until well combined.
Slowly add in dairy free milk while stirring, the mixture should become creamier
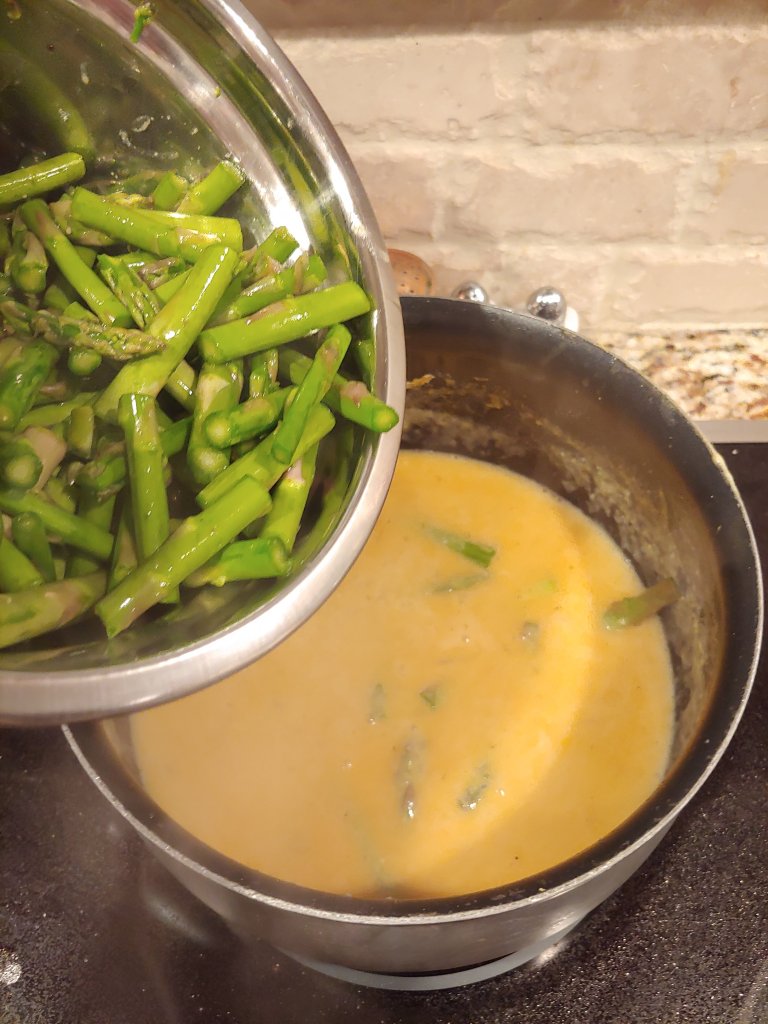
Pour in white wine, lemon juice, and asparagus. Simmer for 2 minute and then reduce heat to low for at least 10 minute or while everything else comes together.
Adjust flavor as needed
Crispy chickpeas
Preheat oven to 400 F
Drain and rinse chickpeas (saving liquid for gnocchi). Pat dry between 2 paper towels
Place chickpeas in a pan with all other ingredients and shake to coat
Bake for 20 minutes or until crispy and golden
Roasted cherry tomatoes
Add cherry tomato halves with oil and seasonings to a pan over medium high heat.
Saute until they begin to crinkle and lose their shape
To plate place gnocchi in a bowl or on a plate, top with sauce, then tomatoes, then chickpeas. This is really a whole project but is so worth it in the end.